
In this article, I will share with you simple ways that you can use to type in Hindi/Urdu/Gujarati/Sanskrit on a Mac.
Moreover, you can use these methods to type in any language on your MacBook or iMac.
There are three methods of typing in Hindi on a Mac. Let’s start with the first.
1). Use the Inbuilt Mac Keyboard Option
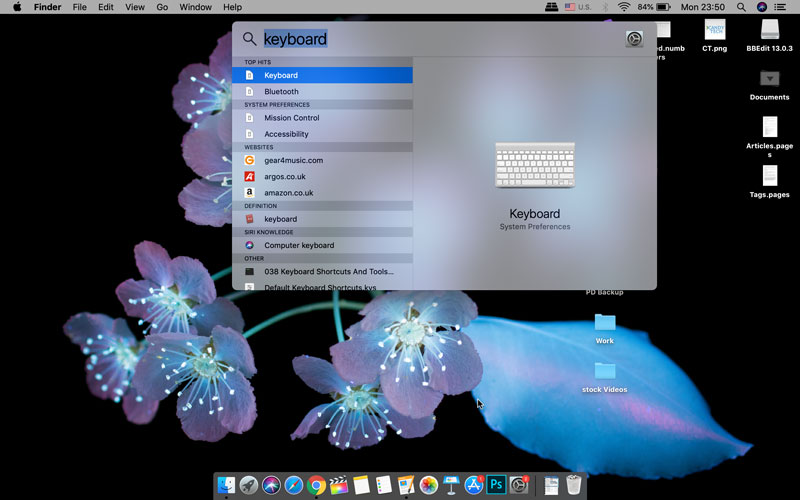
You can search for “Keyboard” by opening the Spotlight Search.
To open the Spotlight search, please press the command + space bar on your Mac.
Once the spotlight search bar appears, type the Keyboard and click the keyboard icon. (As shown in the image below).
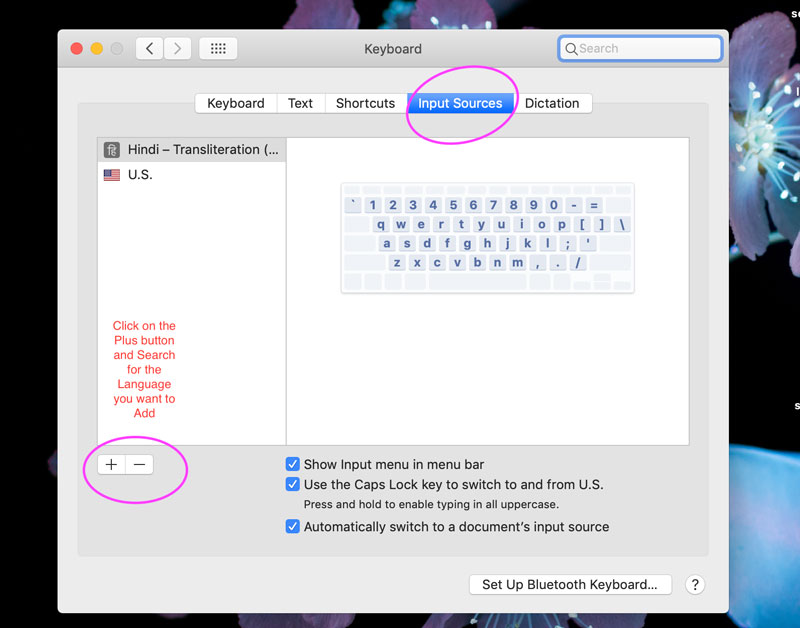
Next, Goto Input Sources Tab, and you will see a small sign + to add a language, as shown in the screenshot below.
Next, search for Hindi Font, and you will get three options – choose the Hindi Transliteration.
The Hindi Transliterations allow you to type in English on your Mac, but it will convert it into Hindi automatically.
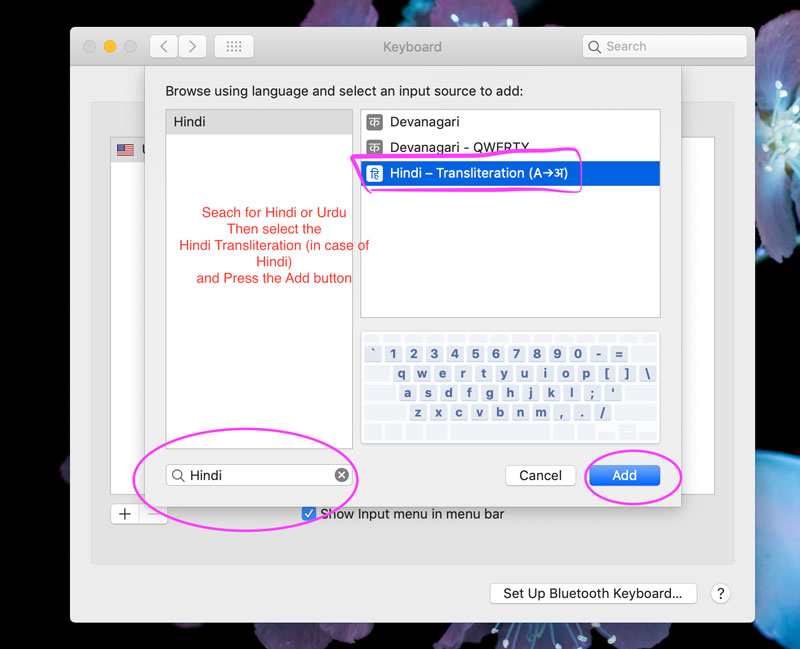
For instance, if you write Bhaimere.com it will appear as भाइमेरे।काम. Using the Hindi Transliteration method helps you to type in English and it will automatically change in Hindi.
Changing Your Keyboard to Hindi
If you want to convert your Mac Keyboard to Hindi, You can choose the Devanagari font.
It will convert your Keyboard to the Hindi keyboard.
I am sure most people want to type in English and want to convert it to Hindi automatically as they type. It is an easy and better way to type faster in Hindi.
So the first option is best for you.
If you are using the Microsoft Indic language input tool on Windows, this is the best alternative for it on the Mac.
How to type in Tamil, Chinese, or Urdu?
You can search and select the language you want to use.
How to quickly switch from one typing language to another on Mac?
Once you have selected the language, you may want to switch back to English and vice-versa.
It is possible — to tick on the option of showing the input language on the menubar. Now you will be able to see the option to switch language quickly on the menu bar. (see the image below)

Another nifty tip is to tick the use of capslock for quick switching between the two languages that you are using. It is a big time saver if you want to switch languages quite often. (Tick All three options as shown in the image above).
If you are not happy with the in-built Hindi writing tool on the Mac, then you can try the next technique.
2). Use Google Chrome Input Tools Extension
If you are a Google Chrome user, there is a small chrome extension (Google Input Tools) that is handy to help you type accurately in different languages on your Mac.
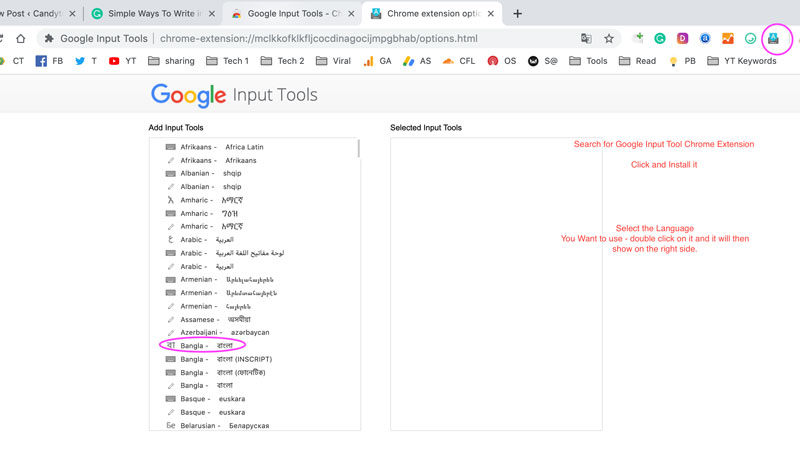
You can install the extension and then click on the options. (Link to – Install – Google Input Tool Chrome Extension.)
Once you have installed it, click the icon on the top right on Chrome. (As shown in above image).
Select the Extension Options.
Next, select the language that you want to use as a secondary language, e.g. Hindi.
You can then open any website or Google Docs to start typing in Hindi.
You can later copy-paste your Hindi text anywhere to a document/Photoshop on your Mac or even to the keynote or pages.
Next, I have a very Cool tip to write super fast in Hindi or your native language using Voice typing.
3). Use Google Voice Typing to Type Everything in Hindi.
Another superb hack to type much faster in Hindi is to speak and let your Mac or PC type in Hindi.
Go to – docs.google.com to open a Text File.
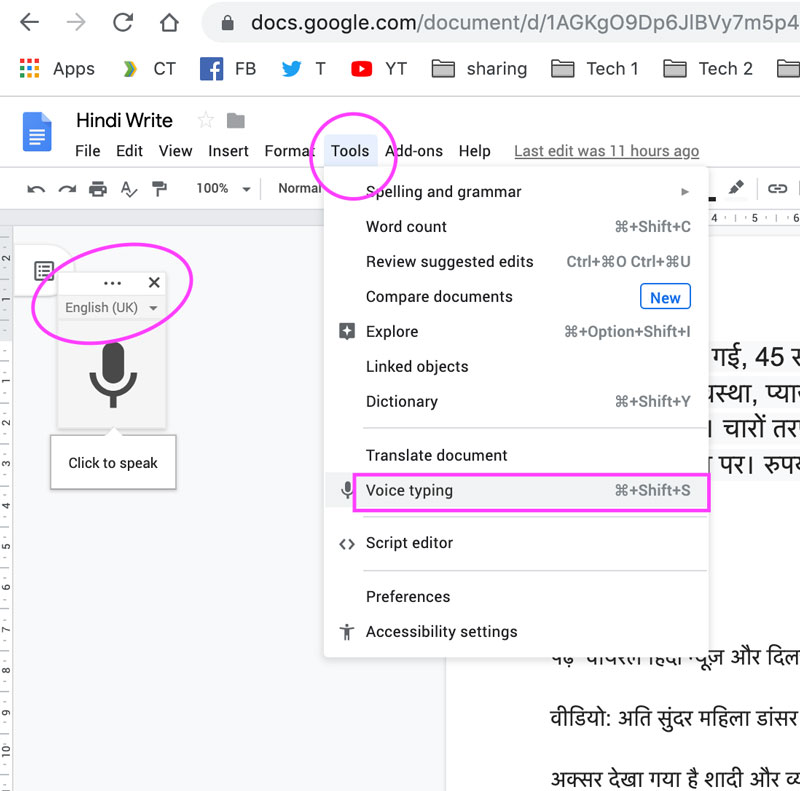
Open Google Doc and select Tools >> Voice Typing. You will see a microphone.
At the top of it, there is a small language selection menu.
Select the language (Hindi in my case) and start speaking into the microphone.
Make sure your external microphone is configured or you can even use the in-built mic on your Mac.
Voila!!! It is a super fast and efficient way to type in Hindi/Urdu or your local language using Voice Typing.
Cool, we are done with this tutorial.
If you are facing any issues, please share in a comment below and I will try to address them.


